HOW TO PACK AN EMT 140 PLATE REVERB FOR SHIPPING
After damaging 14 of 21 plate reverbs that I bought from CBS in NY, in 1983 or so, I devised this packing method. It has proven to be very effective. However, no packing job can stand up to the determined assault of a rabid forklift! The main problem in moving plates is that when a unit is dropped, the plate falls and breaks the little springs and clips that hold it onto the frame. When the plate falls, it shears off the pickups, and ruins the driver coil as well. The plate itself may be bent, but that is not usually a major problem … so … to pack the plate:
Everolimus completely impaired male rat fertility at an everolimus dose that resulted in a drug exposure (blood AUC) that was slightly below 1 the expected maximum human value. Do not use cosmetics or other skin care products on the treated area. Please also be aware that the effects of chlordiazepoxide can last into the following day http://farmaciasinreceta.org/. Check with your doctor right away if you start to have a stiff neck, drowsiness, fever, severe headache, nausea, vomiting, painful eye movements, or eye sensitivity to light.
1) Remove both sides by removing the 10mm bolts that hold the sides on. Be careful not to drop the sides on your foot, as they are quite heavy.
2) Remove the driver magnet. It is roughly the size of a fist. Located near the center of the plate, it is cylindrical and held on by screws. When removing it, pull it straight back so as to not damage the driver coil, which remains affixed to the plate after the driver magnet is removed. Replace the screws into their holes and tighten them snugly for shipping. When replacing the driver magnet, it is important to not damage the driver coil, and the driver coil must be centered in the driver magnet slot. EMT made a special plexiglass guide for this purpose.
3) Remove the electronics from the end of the plate. First remove the connectors by pulling them straight back. They do not unscrew. Remove the cover plate and the electronics by unscrewing the appropriate screws. Pack the electronics and the driver magnet in a separate carton. Do a good job. The driver magnet is nearly irreplaceable; DONT LOSE IT!
4) Loosen the plate by unscrewing one corner bolt 1 turn only. Make note of which one you loosened.
5) Using gaffers tape or packaging tape, tape the plate itself so that it is taped many many times to the pipe frame. Do not tape it to the damper mechanism. At least 40 pieces of tape must be used!
6) If there is tape residue on the plate after unpacking, use some alcohol or Goof Off to remove it.
7) Tape the damper arms so that the damper cannot move in any way. Do not tape the damper to the plate.
8) Replace the sides on the plate. This is not that easy, but you can do it. It requires 2 or 3 people.
9) The plate is ready to move.
10) To move one requires a piano dolly or other small, 4 wheeled, rolling dolly. The EMT weighs 425 pounds. You only ever want to lift one end, never both ends at the same time. Two 20-26 inch pipes or other similar “handles” are pushed through the holes in the metal brackets at either end of the plate.
11) Two people at each end of the plate, one at each end of the two metal pipe handles, is the prescribed method of moving. Remember, the object is to not drop the plate, and for everyone to be able to walk the next day. If you move it in a truck, be sure it is well tied down.
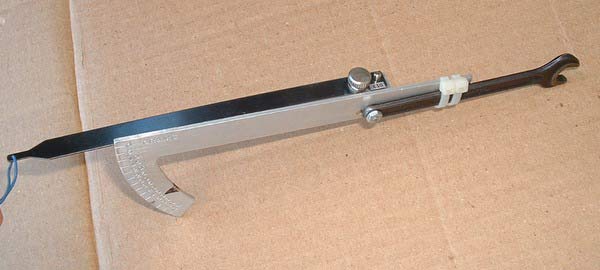
Making a calibrated wrench for the purpose of tuning an EMT 140 plate reverb.
Here is a simple, effective solution for a problem that’s been bugging studio techs for 60 years.
The following items are required:
– A 10mm wrench suitable for turning the 10mm “tensioning bolts” on the plate. A one-ended wrench is preferable.
– A piece of spring steel approximately 5-7 inches in length and ¾ of an
inch wide with a small hole in one end. These dimensions are not critical. See the photos to get an idea of how to shape it.
– Several small tie wraps or other ingenious method of attaching the spring steel to the wrench.
– A handle of thin insulated wire or hefty string about 8 – 10″ long.
– A metal protractor approximately 5″ – 7″ at the base. This will be cut so the size is not overly critical.
Please see the accompanying photographs for correct assembly.
If you can’t figure it out from the pictures, I don’t suggest Ikea…
Calibrating the wrench.
You will need one or two spare springs.
After assembly, use the wrench to tighten one tensioning bolt until you break the spring, noting on the protractor scale when you reach the breaking point. Mark a spot on the scale slightly lower than this point. Make the mark permanent, as you want to minimize the number of springs that you break.
Instructions for use.
– Tighten the tensioning bolts reasonably tight.
– Place the calibrated wrench on one of the tensioning bolts.
– Pull down on the wire loop attached to the end of the spring steel until the spring steel reaches the calibrated point on the protractor scale.
– Remove the wrench and move on to the next bolt.
– You may want to repeat the process a second time after you have gone all around the plate.
– The actual tuning process for a plate takes about 10 minutes and produces an even tension around the plate that is as tight as it can be without breaking springs.
Credit for the invention of this device must be given to Mr. Steven Schulze, a clever fellow and a fine technician.
Tuning and Cleaning an EMT 140 Plate Reverb.
There are few alignment procedures in audio as mysterious and misunderstood as tuning an EMT 140 plate reverb. We are going to set the record straight now. There are two parameters and only two parameters affected by tuning a plate. The low frequency decay time is determined by how tight the plate is tuned. The overall smoothness of the reverb decay is determined by the evenness of the tension around the plate. I suggest that a torque wrench of a correct type to allow accurate adjustment of the plate tension is a great tool. Tuning plates by ear is a frustrating and near impossible task. We built our own wrench with a piece of spring steel attached to a hand wrench with a calibrated scale attached. You want to get the plate as tight as possible without snapping the springs and clips which hold the plate on the frame. It helps to have a few extras when you are calibrating your torque wrench.
Aside from tuning, it is nice to have a clean, rust free plate. We have had great luck with a floor buffer and white Dupont rubbing compound on very badly rusted plates. Naval jelly, available from most hardware stores works well to remove small amounts of rust. With the plate still mounted in the frame, but to machine buff, the plate itself first must be completely removed from the frame and laid flat on a piece of plywood. Using plenty of white Dupont rubbing compound and a steel wool polishing pad on a floor polishing machine works wonders. One can easily polish the plate to a degree never done by EMT.

Great article, Dan. One comment:
“After assembly, use the wrench to tighten one tensioning bolt until you break the spring,”
I think you mean “pull on the spring loop till it breaks”, right? I looked at the picture a dozen times and thought that if you just grip the wrench handle and tighten, the spring/protractor tells you nothing because it moves with the wrench. It may be obvious to you, but you have to be crystal clear on these things for dummies like me.
Hi Dave–
I work for Dan. He rarely checks his blog comments, sorry! There is so much spam it’s overwhelming.
He said to give him a call about this. 510-527-1411
(ALso, you can use his email if you need to: [email protected])
Thanks!